Dedicated ServerとはDon't Starve Togetherのホスト機能をスタンドアローンでサーバーを稼働させる事ができる機能です。 ホストとの違いはプレイヤーが存在しない状態でもワールドをオンラインの状態のまま維持することができることです。これによって例えばホストプレイヤーが席を外さなければならない状況でもゲームを抜けることで安全な状態にできるメリットがあります。
必要なもの[]
サーバー管理者はDon’t Starve Togetherを所有している必要があります。1つのゲームで複数のDedicated Serverを建てることができます。
- ポートの解放が必要です。デフォルトでUDPの10999を使用します。
- ネットワークの知識、また使用するOS(WindowsやLinux)を扱う知識。
- 快適なサーバーを提供できるPCのスペック。以下におおまかな必要システム:
Internet (Upload) = 8Kbytes / player / s
Ram =  around 65Mbytes/player
CPU = N/A
VCRedist_2008 (x86)
インストール[]
ソフトウェアのダウンロード方法[]
Kleiは2種類のダウンロード方法を提供しています。
今回ここではWindowsを使用した方法を優先的に表示します。Linuxでは[展開する]をクリックすることで表示できます。
SteamCMDからダウンロード、ならびにSteamCMDのインストール[]
- SteamCMDについてはこちらを参照: https://developer.valvesoftware.com/wiki/SteamCMD
- 上記のサイトからhttps://steamcdn-a.akamaihd.net/client/installer/steamcmd.zipをクリックしてダウンロードし、steamcmd.zipを解凍します。
- 解凍したsteamcmd.exeをSteamCMDをインストールしたいディレクトリ(例c:/steamcmd/)に移動し、steamcmd.exeを起動します。
- 起動すると必要なファイルが同じディレクトリに自動でダウンロードされ、インストールされます。「Steam>」という文字列が出るとインストールが完了します。
Windows[]
- SteamCMDのインストールが完了したら下記のコマンドを入力することでDon't Starve Together Dedicated Serverに必要なファイルがダウンロードされます。
- force_install_dirのC:\DSTserverはインストールしたディレクトリを記述してください。
login anonymous
force_install_dir C:\DSTserver
app_update 343050 validate
- Success! App '343050' fully installed.と表示されたらインストールが完了します。
Linux (Debian)[]
sudo dpkg-add-architecture i386 # If running a 64bit OS
sudo apt-get update
sudo apt-get install lib32gcc1    # If running a 64bit OS
sudo apt-get install lib32stdc++6 # If running a 64bit OS
sudo apt-get install libgcc1      # If running a 32bit OS
sudo apt-get install libcurl4-gnutls-dev:i386
sudo useradd -m steam
chmod a+rw `tty`  # Note those are backticks, not single quotes
sudo su - steam
mkdir ~/steamcmd
cd ~/steamcmd
wget http://media.steampowered.com/installer/steamcmd_linux.tar.gz
tar -xvzf steamcmd_linux.tar.gz
./steamcmd.sh
login anonymous
force_install_dir /home/steam/steamapps/DST (or whatever absolute path is wanted)
app_update 343050 validate
quit
cd /home/steam/steamapps/DST/bin/
screen -S "DST Server" ./dontstarve_dedicated_server_nullrenderer
Note: If the GSAs server runs Debian stable (debian 7 / Debian Wheezy), the GSA will not be able to launch the server because of the old libc version. The error will be :
./dontstarve_dedicated_server_nullrenderer: /lib/i386-linux-gnu/i686/cmov/libc.so.6: version `GLIBC_2.15' not found (required by ./dontstarve_dedicated_server_nullrenderer)
Here is a hacky workaround (using the git repo) : https://github.com/dgibbs64/linuxgameservers/tree/master/Insurgency/dependencies )
mkdir ~/dst_lib && cd ~/dst_lib
wget https://github.com/dgibbs64/linuxgameservers/raw/master/Insurgency/dependencies/libc.so.6
wget https://github.com/dgibbs64/linuxgameservers/raw/master/Insurgency/dependencies/libpthread.so.0
wget https://github.com/dgibbs64/linuxgameservers/raw/master/Insurgency/dependencies/librt.so.1
And to run the server :
cd /home/steam/steamapps/DST/bin/
screen -S "DST Server" bash -c 'LD_LIBRARY_PATH=~/dst_lib ./dontstarve_dedicated_server_nullrenderer'
The server will start, then the GSA can press CTRL+A and then D to allow them to exit to a shell. If the GSA wants to see it again, just type:
screen -r
Linux (Gentoo x64)[]
To run a dedicated server GSAs should enable Multilib system without emul packages, read the official manual on how to make it.
After the GSA's system updates they will have to add the following lines into /etc/portage/package.use:
net-misc/curl curl_ssl_gnutls -curl_ssl_openssl abi_x86_32
and rebuild the curl with
emerge -av curl
After curl merge is successful the GSA would probably need to link their /usr/lib32/libcurl.so.4 to /usr/lib32/libcurl-gnutls.so.4 to make DST work.
ln -s /usr/lib32/libcurl.so.4 /usr/lib32/libcurl-gnutls.so.4 && ldconfig
Steamからダウンロード(Windowsまたは“Desktop Linux”のみ = GUIが必要)[]
Don’t Starve Togetherを所有しているアカウントで‘ツール’の'Don't Starve Dedicated Server'からインストール
アップデート方法[]
Windows[]
バッチファイルを作成します。(例えばupdateddst.bat) -- テキストエディタで開き、以下の文を入力し保存:
steamcmd +login anonymous +force_install_dir D:\Servers\DST\ +app_update 343050 validate +quit
D:\Servers\DST\はあなたがサーバーファイルをインストールしたディレクトリを指定してください。
Linux[]
To create an update script, stop the server and type:
$ vim /home/steam/update_dst.sh
Then add this to the file update_dst.sh and don't forget to change the game path or steamcmd path as needed.
#!/bin/sh

/home/steam/steamcmd/steamcmd.sh +@ShutdownOnFailedCommand 1 +@NoPromptForPassword 1 +login anonymous +force_install_dir /home/steam/steamapps/DST +app_update 343050 validate +quit

/home/steam/steamapps/DST/bin/dontstarve_dedicated_server_nullrenderer -only_update_server_mods
This script will update the DST application from Steam, then upate any mods the GSA installed. Make it executable:
$ chmod +x update_dst.sh
When a GSA wants to update their server; reconnect to the screen session, do a c_save() to save the server, then do a c_shutdown. Once the server has shutdown it will return the GSA to the command line.
Then do the following
$ /home/steam/update_dst.sh
When finished GSAs will see "Shutting down" and the GSA will be returned to the CLI.
Then to start the server, if the GSA has used the startup scripts just type ./start_dst.sh. (See below if the start_dst.sh file is still not created)
コンフィグ[]
サーバーの必要なファイルは二箇所のディレクトリに分かれています。
- 実行ファイルdontstarve_dedicated_server_nullrenderer.exeのあるディレクトリは以下になります:
Windows[]
C:/DontStarve/bin/dontstarve_dedicated_server_nullrenderer.exe
Linux[]
/home/steam/steamapps/DST/bin/dontstarve_dedicated_server_nullrenderer
- セッティングファイルのあるディレクトリは以下になります:
Windows[]
Documents/Klei/DoNotStarveTogether/
Linux[]
~/.klei/DoNotStarveTogether/
Note that if the GSA will be playing DST from the same computer they are hosting the dedicated server on, they should use a different configuration directory for the dedicated server. This can be done by using the launch option -conf_dir myDSTserver, which will change it to use this folder:
Documents/Klei/myDSTserver/
The main method for configuring their dedicated server is through the settings.ini file. If the setting.ini file is not there, they will have to make it with a text editor of their choice.
Windows[]
Documents/Klei/DoNotStarveTogether/Settings.ini
Linux[]
~/.klei/DoNotStarveTogether/settings.ini
設定はカテゴリごとに分かれており、別のカテゴリに移動させないでください。 メモ帳などのテキストエディタを使用して編集します。太字は必須項目です。
記述例:
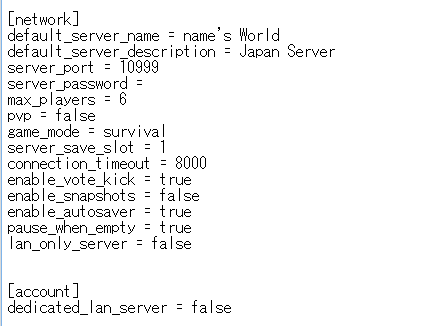
[network][]
サーバーネーム。英数字で記述する必要があります。
default_server_name = A unique server name
サーバーの説明。英数字で記述する必要があります。
default_server_description = A very nice server description
使用するポート。デフォルトは10999
server_port = 10999
参加に必要なパスワード。パスワードの必要がなければ記述しないこと
server_password = password
参加できるプレイヤー数。デフォルトで6
max_players = 1 .. 64
PVPの有効/無効
pvp = true | false
ゲームモード。の設定。endless | survival | wildernessのいずれかを記述。
game_mode =
スナップショットとはワールドのロールバック機能です。この機能は新しいためサーバー上で問題を起こす可能性があります。
enable_snapshots = [true | false]
オートセーブ機能の有効化。一日の始まり時にセーブします。サーバー再起動時に再開できます。
enable_autosaver = [true | false]
簡単に説明するとサーバー処理のfps。30の場合1秒間に30回の処理を行うというもの。値を高くするとクライアントとの通信がスムーズになりますがCPU能力を多く必要とします。デフォルトで30
tick_rate = 30 [ 10 | 15 | 30 | 60 ]
応答のないクライアントとの接続を切断するまでの時間
connection_timeout = 8000
使用するセーブスロットを選択。1~5
server_save_slot = 1..5
管理者がいない場合など投票でプレイヤーをキックする機能
enable_vote_kick = [true | false]
プレイヤーが誰も存在しない場合ワールドの時間が進まないようにする機能
pause_when_empty = [ true | false ]
[account][]
LANのみで使用する場合はtrue。使用しない場合はfalse:
dedicated_lan_server = [ true | false ]
コマンドラインオプション[]
コマンドラインオプションを使用することでsettings.iniの設定を無視して変更することができます。
ポートを強制的に指定した値に変更します
-port [1024 .. 65535]
tick rateを強制的に指定した値に変更します
-tick [15 .. 60]
参加できるプレイヤー数を強制的に指定した値に変更します
-players [1 .. 64]
コマンドラインコンソール入力を有効にします
-console
強制的にLANモードで起動します。サーバートークンを必要とせずサーバーブラウザに表示されません。同じLAN内のプレイヤーのみ参加できます。
-lan
強制的にセッティングファイルとセーブファイルのあるディレクトリを変更します。以下に書かれてるものはディレクトリ名ではなくパスを指定します。例えば'DoNotStarveServerDirectory'の場合は~/.klei/DoNotStarveServerDirectoryと記述します。主に同じPCで複数のサーバーを建てる場合などに使用します。
-conf_dir DoNotStarveServerDirectory
Setting the root directory of persistent storage. E.g. on Windows this defaults to the current user documents folder / klei. This is used in conjunction with conf_dir to generate the path where files are stored.
-persistent_storage_root <AltPersistentStorageRoot>
サーバートークン[]
Dedicated Serverをオンラインで公開するには“server token(サーバートークン)”というものが必要です。 このトークンはDon’t Starve Togetherを所有しているという証になります。
サーバートークンの生成の仕方を説明します:
Don’t Starve Togetherを起動します。 (Steamにログインしたアカウントで実際のゲーム).。Play Multiplayerをクリックします。
アットマークキー(@)を押し、コンソール画面を開き下記のコマンドを入力:
TheNet:GenerateServerToken()
このコマンドを入力することで server_token.txtというファイルが生成されます。サーバートークンはserver_token.txtに記述されており以下の場所に生成されてます:
Windows[]
/My Documents/Klei/DoNotStarveTogether/server_token.txt
Linux[]
~/.klei/DoNotStarveTogether/server_token.txt
Mac OS X[]
~/Documents/Klei/DoNotStarveTogether/server_token.txt
server_token.txtはディレクトリを変更している場合そのディレクトリに生成されます。このファイルはゲームを実際に所持しているという認証のために必ず必要です。
ファイルに記述された内容をそのままコピーして別のPCに張り付けないでください。別のPCに移動させるにはファイルを直接移動させてください。
The server_token.txt is a null byte terminated ASCII file (no line endings). If the GSA attempts to copy-paste the contents of the token file, the null byte will be omitted and a line ending will be appended to the end. The dedicated server software will not be able to properly parse the server_token.txt file in this case.
If the server is hosted on a machine without a GUI, like a Ubuntu server, a good way to put the GSA's server token information in the server would be to put it in the settings.ini file under the [account] section.
server_token = [insert personal server token]
起動[]
セッティングしたサーバーを起動するにはdontstarve_dedicated_server_nullrenderer.exeを起動します。ショートカットを作りコマンドラインで起動する場合は以下:
Windows:
dontstarve_dedicated_server_nullrenderer.exe [-conf_dir <AlternativeDirectory>]
Linux:
Create a shell script to start screen and run the DST server. Once the shell script is running GSAd can press and release CTRL+A then press D and it will return them to their shell and continue running DST.
$ vim start_dst.sh
Put the following in the file start_dst.sh. The -console option can be added to allow commands from the DST console, c_save(), c_shutdown() etc...
What this script does it to start the screen utility which will allow GSAs to detach from the shell and continue running, even when logged out, and reconnect as needed. Screen is told to start a shell and run the DST application.
#!/bin/sh
cd /home/steam/steamapps/DST/bin
/usr/bin/screen -S "DST" /bin/sh -c './dontstarve_dedicated_server_nullrenderer -console'
If the GSA needs the additional library path LD_LIBRARY_PATH=~/dst_lib when starting DST do the following.
#!/bin/bash

cd /home/steam/steamapps/DST/bin

/usr/bin/screen -S "DST" bash -c 'LD_LIBRARY_PATH=~/dst_lib ./dontstarve_dedicated_server_nullrenderer -console'
Save and exit VIM with : wq then chmod 700 start_dst.sh.
GSAs now can start their server from the command line logged in as a Steam user by typing ./start_dst.sh
If they wish keep the server running and return to the shell prompt they can press and release CTRL+A then press D and their server will keep running and they can log out.
To return to their running DST server login as their user account and do a sudo su - steam command. Then type screen -r and it will reopen the screen they detached from previously, they will now be at the console of their dedicated DST server.
同じPCで複数のサーバーを建てるには[]
1台のPCで複数のサーバーを起動することができます。セッティングファイルを共有して使うことができないためコマンドラインの-conf_dirを使用して別々のセッティングファイルを使用します。
Steamのツールから起動する場合はプロパティの起動オプションに記述します。
-conf_dir DoNotStarveServerDirectory
This would change their configuration directory to Documents/Klei/DoNotStarveServerDirectory/ (or ~/.klei/DoNotStarveServerDirectory on Linux). GSAs will then have a unique set of save slots, log.txt and settings.ini files.
Customizing the World Map[]
To generate a custom map with a dedicated server, GSAs will have to create a "lua" file in their configuration directory (~/Klei/DoNotStarveServerDirectory) named worldgenoverride.lua. This file should return a table containing a key "override_enabled" assigned to true or false, and other keys containing tables of settings. An example of this is:
return {
	override_enabled = true,
	misc = { season="shortboth", world_size="huge", season_start="summer" },
	resources = { flint="never", grass="never", sapling="never", trees="never" }
}
Here is the table of options and their potential settings:
 return {

 override_enabled = true,
       unprepared = { -- "never", "rare", "default", "often", "always"
               berrybush = "default",
               cactus = "default",
               carrot = "default",
               mushroom = "default",
       },
       misc = {
               task_set = "default", -- Biomes: "classic", "cave_default"
               start_location = "default", -- Start: "plus", "darkness", "caves"
               autumn = "default", -- "noseason", "veryshortseason", "shortseason", "default", "longseason", "verylongseason", "random"
               boons = "default", -- "never", "rare", "default", "often", "always"
               branching = "default", -- "never", "least", "default", "most"
               day = "default", -- "default", "longday", "longdusk", "longnight", "noday", "nodusk", "nonight", "onlyday", "onlydusk", "onlynight"
               frograin = "default", -- "never", "rare", "default", "often", "always"
               lightning = "default", -- "never", "rare", "default", "often", "always"
               loop = "default", -- "never", "default", "always"
               season_start = "default", -- "default", "winter", "spring", "summer", "random"
               spring = "default", -- "noseason", "veryshortseason", "shortseason", "default", "longseason", "verylongseason", "random"
               summer = "default", -- "noseason", "veryshortseason", "shortseason", "default", "longseason", "verylongseason", "random"
               touchstone = "default", -- "never", "rare", "default", "often", "always"
               weather = "default", -- "never", "rare", "default", "often", "always"
               wildfires = "default", -- "never", "rare", "default", "often", "always"
               winter = "default", -- "noseason", "veryshortseason", "shortseason", "default", "longseason", "verylongseason", "random"
               world_size = "default", -- "default", "medium", "large", "huge"
       },
       animals = { -- "never", "rare", "default", "often", "always"
               alternatehunt = "default",
               angrybees = "default",
               beefalo = "default",
               beefaloheat = "default",
               bees = "default",
               birds = "default",
               butterfly = "default",
               buzzard = "default",
               catcoon = "default",
               frogs = "default",
               hunt = "default",
               lightninggoat = "default",
               moles = "default",
               penguins = "default",
               perd = "default",
               pigs = "default",
               rabbits = "default",
               tallbirds = "default",
       },
       monsters = { -- "never", "rare", "default", "often", "always"
               bearger = "default",
               chess = "default",
               deciduousmonster = "default",
               deerclops = "default",
               dragonfly = "default",
               goosemoose = "default",
               houndmound = "default",
               hounds = "default",
               krampus = "default",
               liefs = "default",
               lureplants = "default",
               merm = "default",
               spiders = "default",
               tentacles = "default",
               walrus = "default",
       },
       resources = { -- "never", "rare", "default", "often", "always"
               flint = "default",
               flowers = "default",
               grass = "default",
               marshbush = "default",
               meteorshowers = "default",
               meteorspawner = "default",
               reeds = "default",
               rock = "default",
               rock_ice = "default",
               sapling = "default",
               trees = "default",
               tumbleweed = "default",
       },
}
To customize the world from the Don't Starve Together graphical client for a dedicated server, GSAs can follow the following steps. This is the legacy method.
Creating the Map[]
To create a custom map for a dedicated server, launch the Don't Starve Together client and select the option to Host Server on the server selection screen. Take note of which slot is used to generate the world, as GSAs will need to set its number in the dedicated server's settings.ini. Then they can select the option to Edit World on the right.
On the Edit World options screen, GSAs may select the world options for the new world they wish to run as a dedicated server. It is not necessary to save their settings as a preset, though they may do so if they wish to reuse the settings later. When finished, select the option to Apply the settings.
Back on the server creation screen, enter a world name and description. This is required, but note that these settings are overridden in the persistent server's settings.ini file, so enter any legal values. The server will briefly appear in Klei's server selection screen, so it's not advised to choose a vulgar or obscene name. Once ready, select the Create Server option on the left.
GSAs will then see the Generating World screen while the map is generated, and next be placed on the Character Selection screen. At this point, the map is generated and there is no need to actually play on it, so select the option to Disconnect and confirm the option to shut down the server (Do it!) when prompted. They may now exit the Don't Starve Together graphical client.
In their Don't Starve Together directory, which is Documents\Klei\DoNotStarveTogether\save on Windows, or ~/.klei/DoNotStarveTogether/save on Linux, there will now be a file named saveindex, and a folder named server_temp. Copy both of these servers into the configuration directory for the dedicated server (or leave them in the same directory if they are not using -conf_dir (this is not recommended!)).
In the Dedicated Server's settings.ini file, ensure that the server_save_slot parameter in the [Network] section matches up with the save slot number GSAs will use. For example, if they are using slot 2, they should have this in their settings.ini file:
[Network]
server_save_slot = 2
Mods[]
Dedicated servers support Mods too, and can be automatically installed via dedicated_server_mods_setup.lua in the main mods directory ("server install folder"\mods ; if the file is missing from the build it has to be created manually). This file is run on boot and will download any mods or collection of mods that are setup in the file. An example of this file would be.
Note: The mods folder if you used steam to download the dedicated server is located at \steam\steamapps\common\Don't Starve Together Dedicated Server\mods
ServerModSetup("345692228")
ServerModSetup("346968521")
ServerModSetup("352373173")
ServerModCollectionSetup("379114180")
The mods only update when the version changes on the Workshop, so server boot times should be reasonable and only pickup mod changes as they get posted to the Workshop. These mods will be downloaded and installed to the GSA's mod folder, but they aren't enabled by default.
There are two command line options for controlling how the dedicated_server_mods_setup.lua is used. They are meant to be used by hosts that are running several dedicated servers on a single machine.
-skip_update_server_mods - skips the download of any mods or collections in the file
-only_update_server_mods - quits once the downloads are finished.
To enable mods on dedicated servers, there are two ways. The first is to force enable the mods. To do this, the file modsettings.lua will need to be modified to force enable the mods they desire. For example this would enable three mods from the Workshop.
ForceEnableMod("workshop-345692228")
ForceEnableMod("workshop-346968521")
ForceEnableMod("workshop-352373173")
To ensure that clients will be able to download the corresponding mods from the Workshop, GSAs must not change the mod directory names.
The second option is using a modoverrides.lua file. Dedicated servers can now enable mods and set mod configurations via a file in the configuration directory named modoverrides.lua (\Documents\Klei\DoNotStarveTogether\modoverrides.lua). An example of the contents of this file is
return {
    ["workshop-350811795"] = { enabled = true },
    ["workshop-387028143"] = { enabled = true },
    ["workshop-361336115"] = { enabled = true,
        configuration_options =
        {
            hunt_time = 6,
            ["String Phrase Option Name"] = "some value",
        }
    },
    ["workshop-336882447"] = { enabled = true }
}
Note: Dedicated Servers (and normal clients) can override the mod config options to non-valid options using this method. In this example, 6 is not a normal option for the hunt_time in the Hunt game mode mod.
Administration[]
Dedicated Servers can be remotely administered through the game client. The user who generated the server token is automatically granted administrator privileges. An administrator has the ability to kick and ban users in the game, as well as to execute arbitrary lua on the server.
WARNING: Only grant administrator rights to those who the GSA would trust with full access to their server / machine. Klei may add a moderator mode with reduced powers in the future.
If the GSA wishes to provide administrator privileges to additional users, they need to add an adminlist.txt file to their save directory:
On Windows:
Documents/Klei/DoNotStarveTogether/Save/
On Linux:
~/.klei/DoNotStarveTogether/Save/
In this directory add the user identifiers for the users the GSA wishes to grant adminship to. List the KU_’s one per line.
As an admin, the they may issue a remote command to the server by doing the following:
- connect to the world through the game client
- open the developer console (~)
- press left CTRL to enter remote execution mode (REMOTE: appears to the left)
- The command they enter will be executed on the server, assuming they have sufficient administrator rights
- For a full list of console commands, see Don't Starve Together Commands
FAQ[]
* Is it possible to run a dedicated server in LAN mode?[]
Yes, LAN mode can be configured in settings.ini by adding this line under the [account] heading:
dedicated_lan_server = true
Please remember LAN servers do not appear in the online server listings. But the GSA CAN view them by setting the "Show LAN" option in the servers list in Don't Starve Together to on.
* Is it possible to host multiple servers on a single (powerful) machine?[]
Yes, in order to host multiple servers GSAs will want to have multiple configurations.
GSAs can launch a server with a different configuration directory by passing in this command line option:
-conf_dir <NewDirectoryName>
For example, if the GSA enters -conf_dir MyDedi then it will use the folder Documents/Klei/MyDedi for all saving, loading, and configuration that is normally stored in Documents/Klei/DoNotStarveTogether.
* Which save slot does the dedicated server use?[]
By default, 1. GSA's can override the slot through the settings.ini option:
[network]
server_save_slot = [1..5]
Troubleshooting[]
- If the GSA ran the dedicated server before they put a token in the settings.ini they may need to delete their world data. Shutdown the server or client,
In C:\Users\Mark\Documents\Klei\DoNotStarveTogether\save\ delete survival_1. When they restart a new world will be generated
- If the server is running correctly, but it still can’t be seen. Confirm it’s listing here:http://my.jacklul.com/dstservers/. Users will have to manually update the listing at the bottom of the page. If it’s still not visible from inside the game client, it’s because the client can’t ping the server. Assure that the GSA made sure to forward UDP traffic on port 10999 to their machine.
- If the GSA gets the error Account Failed (6): "E_EXPIRED_TOKEN" they will want to verify that they saved the settings.ini file with the server token after they closed the game client, or their changes will get overwritten. Also, make sure that there are no extra characters at the end of the file, even invisible ones.
Other Notes[]
- To find ones own dedicated server when searching in game, the LAN games option must be turned on, as the server is hosted on the same machine and/or network. This does not necessarily mean that it is a LAN game, only that it is running on the same machine and/or network.
- A great recommendation is to use Notepad++ or another such suitable program for editing the code as it offers more options and is generally more helpful to edit these files than the basic notepad or similar word program as it is tailored to these files and coding.
- As mentioned above in command lines, windows users can easily control their servers through the black screen by opening the properties of a shortcut to the server's executable and then typing -console at the end of the target line. ie (~\bin\dontstarve_dedicated_server_nullrenderer.exe -console)
| ゲームガイド | |
| 初心者向け | 基本的な操作と仕組み | 初心者向けガイド | 夜間について | 大まかなイメージ |
| ダウンロードコンテンツ | Reign of Giantsについて | Shipwreckedでサバイバル |
| キャンプ | ベースキャンプ | カエルの池キャンプ | 自給自足 |
| 生産 | 金塊の量産 | Nightmare Fuelの量産 | スルートルスライムについて |
| サバイバル | 敵対モブの殺し方 | どうやって生き残るか | ハウンド襲撃への対処法 | キノコの活用法 | 洞窟探検ガイド | 夏の洞窟キャンプ | 初めての越冬 | 調理鍋で料理 |
| 技術的なもの | コンソールコマンド | 日本語化の方法 ( Dedicated Serverの建て方 |
| キャラクター | Woodieの呪い | (各キャラクターの立ち回りまとめ |